RHEL_9_Foreman_Guide
Foreman 3.10 + Puppet + Katello + Discovery Plugin-Installation- & PXE Beginners Guide for RHEL_9 (using local-DHCP&TFTP)
In this Guide i will show you how to install Forman with puppet, katello and discovery plugin. You will also learn how to install and setup DHCP- and TFTP-Server. I will also show you how to setup Foreman and how to use the Foreman Boot Image via PXE. You will be ready to discover and provision your physical servers and workstations after following this Guide.
before we start:
- foreman comes without its own dhcp/tftp unlike MAAS, Tinkerbell, etc
- you either need to have external dhcp, or you need to install the servers locally
- we will install and we will use Foreman on a single node without external DHCP
- we wont use Smartproxy DNS since its not required if using a local DHCP
- we install Discovery Plugin before setting up TFTP because we have less work
- Its demanded that you install Foreman with Katello on a freshly provisioned machine - you cannot install katello plugin if you installed foreman without it before
- make sure that you have a Backup before using the Installer
- especially if you have set up Foreman successfully before
- you can make backup by using:
- img (dd, gparted)
- rsync (standalone, or better: rsnapshot)
- we use
Rocky Linux 9.4in this example
Preperation
- make sure you have a static hostname (we will use
my_hostname)
switch to root because its easier:
$ su root
get your NIC’s IP and Name:
# ifconfig
enp2s0: flags=4163<UP,BROADCAST,RUNNING,MULTICAST>  mtu 1500
      inet 192.168.2.100  netmask 255.255.255.0  broadcast 192.168.2.255
.
- my NIC is enp2s0 and my IP is 129.168.2.100:
find your NIC’s DNS-Server’s IP and Domain
- we need this for the hosts mapping
- The Domain of your Router should be printed on it, or it was given by your switch, vlan (vlan-routing), etc…
- , but we can also find it out via console:
- we find the connected DNS IP and ask the server for its Domain-name using
nslookup- you can also use
diginstead of nslookup# nmcli device show enp2s0 | grep IP4.DNS# DNS-Server-IP: IP4.DNS[1]: 192.168.2.1# nslookup 192.168.2.11.2.168.192.in-addr.arpa name = speedport.ip.
- you can also use
- we find the connected DNS IP and ask the server for its Domain-name using
- you can also check in the
/etc/resolv.conf- this is set by NetworkManager and the dhcp of your router
# Generated by NetworkManager
search speedport.ip
nameserver 192.168.2.1
nameserver fe80::1%enp2s0
edit the hosts file
- this is set by NetworkManager and the dhcp of your router
- edit
/etc/hosts- the Domain for the host mapping should be:
- <host name+routers domain> ``` 127.0.0.1 localhost localhost.localdomain localhost4 localhost4.localdomain4 ::1 localhost localhost.localdomain localhost6 localhost6.localdomain6
- the Domain for the host mapping should be:
192.168.2.100 my_hostname.speedport.ip
***firewall settings:***
```Bash
# firewall-cmd --add-port="5646/tcp"
# firewall-cmd \
--add-port="5647/tcp" \
--add-port="8000/tcp" \
--add-port="9090/tcp"
# firewall-cmd \
--add-service=dns \
--add-service=dhcp \
--add-service=tftp \
--add-service=http \
--add-service=https \
--add-service=puppetmaster
# firewall-cmd --runtime-to-permanent
» check if it works «
# firewall-cmd --list-all... interfaces: enp2s0 sources: services: cockpit dhcp dhcpv6-client dns http https mdns puppetmaster ssh tftp ports: 5646/tcp 5647/tcp 8000/tcp 9090/tcp ...Install
get the repos
# dnf install https://yum.theforeman.org/releases/3.10/el9/x86_64/foreman-release.rpm
# dnf install https://yum.theforeman.org/katello/4.12/katello/el9/x86_64/katello-repos-latest.rpm
# dnf install https://yum.puppet.com/puppet7-release-el-9.noarch.rpm
install foreman 3.10 with katello plugin
# dnf update
# dnf install foreman-installer-katello
# foreman-installer --scenario katello
...
  Success!
  * Foreman is running at https://my_hostname.speedport.ip
      Initial credentials are admin / <pass>
  * To install an additional Foreman proxy on separate machine continue by running:

      foreman-proxy-certs-generate --foreman-proxy-fqdn "$FOREMAN_PROXY" --certs-tar "/root/$FOREMAN_PROXY-certs.tar.gz"
  * Foreman Proxy is running at https://my_hostname.speedport.ip:9090

The full log is at /var/log/foreman-installer/katello.log
we connect to foreman dashboard by using
URL: https://my_hostname.speedport.ip
user: admin
pass:  <pass>`
install the Discovery Plugin
# foreman-installer --enable-foreman-plugin-discovery
...
  Success!
  * Foreman is running at https://my_hostname.speedport.ip
  * To install an additional Foreman proxy on separate machine continue by running:

      foreman-proxy-certs-generate --foreman-proxy-fqdn "$FOREMAN_PROXY" --certs-tar "/root/$FOREMAN_PROXY-certs.tar.gz"
  * Foreman Proxy is running at https://my_hostname.speedport.ip:9090

The full log is at /var/log/foreman-installer/katello.log
» check if it worked «
# dnf repolist enabled... foreman Foreman 3.10 foreman-plugins Foreman plugins 3.10 katello Katello 4.12 pulpcore pulpcore: Fetch, Upload, Organize, and Distribute Software Packages. puppet7 Puppet 7 Repository el 9 - x86_64
**(optional)* delete old/wrong repo:*
- edit the foreman.repo file and remove the flawed ones:
# dnf clean all
# dnf install nano
# sudo nano /etc/yum.repos.d/foreman.repo
# sudo dnf clean all
# sudo dnf makecache
DHCP
Install:
# dnf install dhcp-server -y
Config:
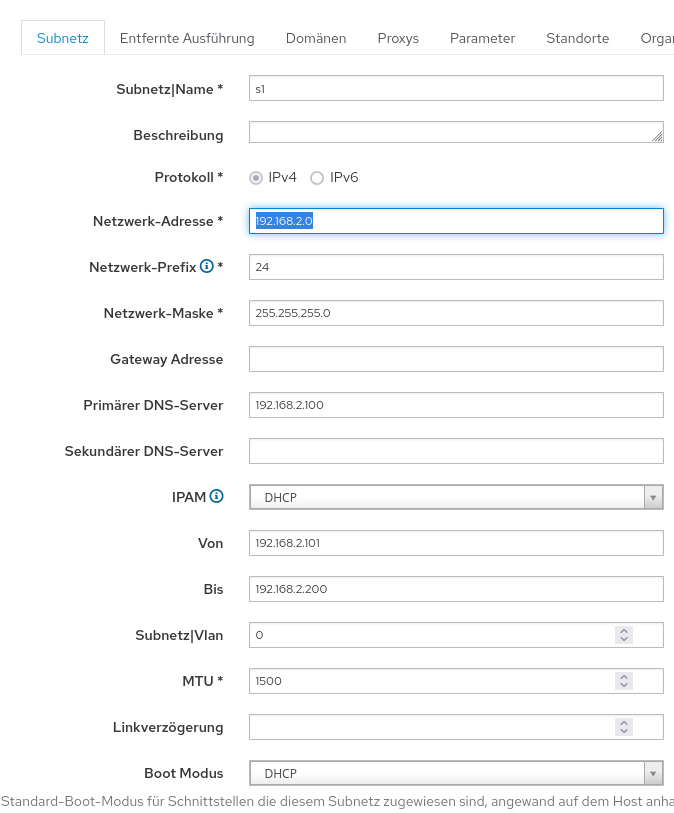
- we add a Subnet
- we choose a Range of 100
- huge Networks can be unnecessary security Risk
- our subnetmask is
255.255.255.0, hence our CIDR is24
- we choose a Range of 100
# sudo nano /etc/dhcp/dhcpd.conf
...
# speedport.ip
subnet 192.168.2.0 netmask 255.255.255.0 {
pool
 {
   range 192.168.2.101 192.168.2.200;
 }
 option subnet-mask 255.255.255.0;
 option routers 192.168.2.100;
}
- Now we can enable the dhcp service
- if this this fails you most likely have wrong subnet or firewall settings
# sudo systemctl enable --now dhcpd
**(optional)* check if dhcp server is already installed and running*
# nmap -sU 127.0.0.1 -p 67# if its not installed or not running: ... PORT STATE SERVICE 67/udp closed dhcps ...# if up and running: ... PORT STATE SERVICE 67/udp open|filtered dhcps ...of course you can check systemctl as well, but since we dont know the name of the service we just check the port directly (DHCP is Port 67 followed by TFTP port 68) you can also use telnet, lsof, etc
TFTP
install
# sudo dnf install tftp-server -y
check if Discovery-Plugin created the Boot-image Files:
- there should be a
/var/lib/tftpboot/boot/fdi-imagedir that holds thevmlinuzandinitrdfiles - you also need to create a config file:
nano /var/lib/tftpboot/pxelinux.cfg/default- the user has to be nobody (system-user) and it should be fully writable
# nano /var/lib/tftpboot/pxelinux.cfg/default
default menu.c32
timeout 300
label ForemanBootImage
 menu label ^Foreman Boot Image
kernel /path/to/your/boot/image/vmlinuz
append initrd=/path/to/your/boot/image/initrd.img root=/dev/nfs nfsroot=:192.168.0.1:/var> > /lib/tftboot/boot ip=dhcp
# sudo chmod -R 777 /var/lib/tftpboot
# sudo chown -R nobody: /var/lib/tftpboot
- Change tftpboot dir if required:
$ nano /usr/lib/systemd/system/tftp.service
[Unit]
Description=Tftp Server
Requires=tftp.socket
Documentation=man:in.tftpd
[Service]
ExecStart=/usr/sbin/in.tftpd -s /var/lib/tftpboot
StandardInput=socket
[Install]
Also=tftp.socket
- not sure if this was required:
sudo nano /etc/xinetd.d/tftp
service tftp
{
socket_type             = dgram
protocol                = udp
wait                    = yes
user                    = root
server                  = /usr/sbin/in.tftpd
server_args             = -s /var/lib/tftpboot
disable                 = no 						# needs to be "no"
per_source              = 11
cps                     = 100 2
flags                   = IPv4
}
- tftp service can be activated by
using systemctl enable tftp(not xintetd)!# systemctl enable tftp - you can check the realtime-logs like this:
# journalctl -u tftp -fMai 24 19:26:15 <user> in.tftpd[26138]: Client ::ffff:192.168.2.104 finished boot/rocky-linux-imLv796i67R9-initrd.img Mai 24 19:41:00 <user> systemd[1]: tftp.service: Deactivated successfully. Mai 26 10:16:08 <user> systemd[1]: Started Tftp Server. Mai 26 10:16:08 <user> in.tftpd[147746]: Client ::ffff:192.168.2.104 finished pxelinux.0Update Foreman
- we set managed dns to false:
--foreman-proxy-dns-managed false \# foreman-installer \ --foreman-proxy-dns true \ --foreman-proxy-dns-managed false \ --foreman-proxy-dhcp true \ --foreman-proxy-dhcp-managed true \ --foreman-proxy-dhcp-range "192.168.2.101 192.168.2.200" \ --foreman-proxy-dhcp-gateway 192.168.2.100 \ --foreman-proxy-dhcp-nameservers 192.168.2.100 \ --foreman-proxy-tftp true \ --foreman-proxy-tftp-managed true \ --foreman-proxy-tftp-servername 192.168.2.100Discovery
Change PXE global temlate
set it to discovery

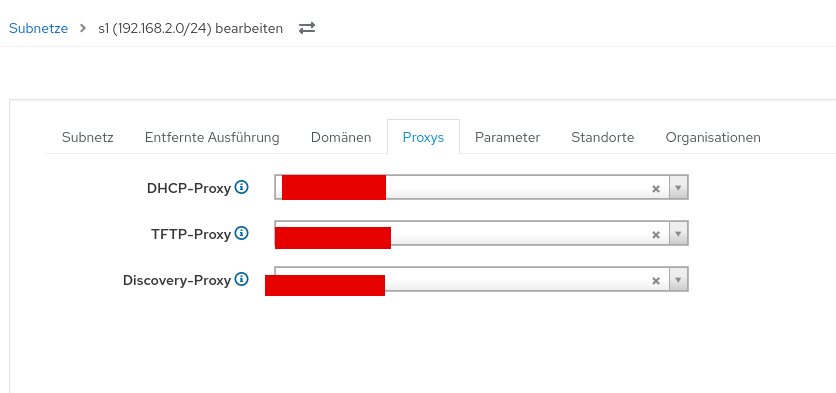
Add a subnet
- i use the maximum range here, but you dont need to if you have multiple hostgroups
- keep in mind that this is limited by your dhcp-settings
Build PXE default template
click on A)
- also make sure to add the proxy to your subnet:
Boot a machine via PXE i was to lazy to setup kvm and libvirt so i used my server here if everything works, you dont need to do anything: just let it run
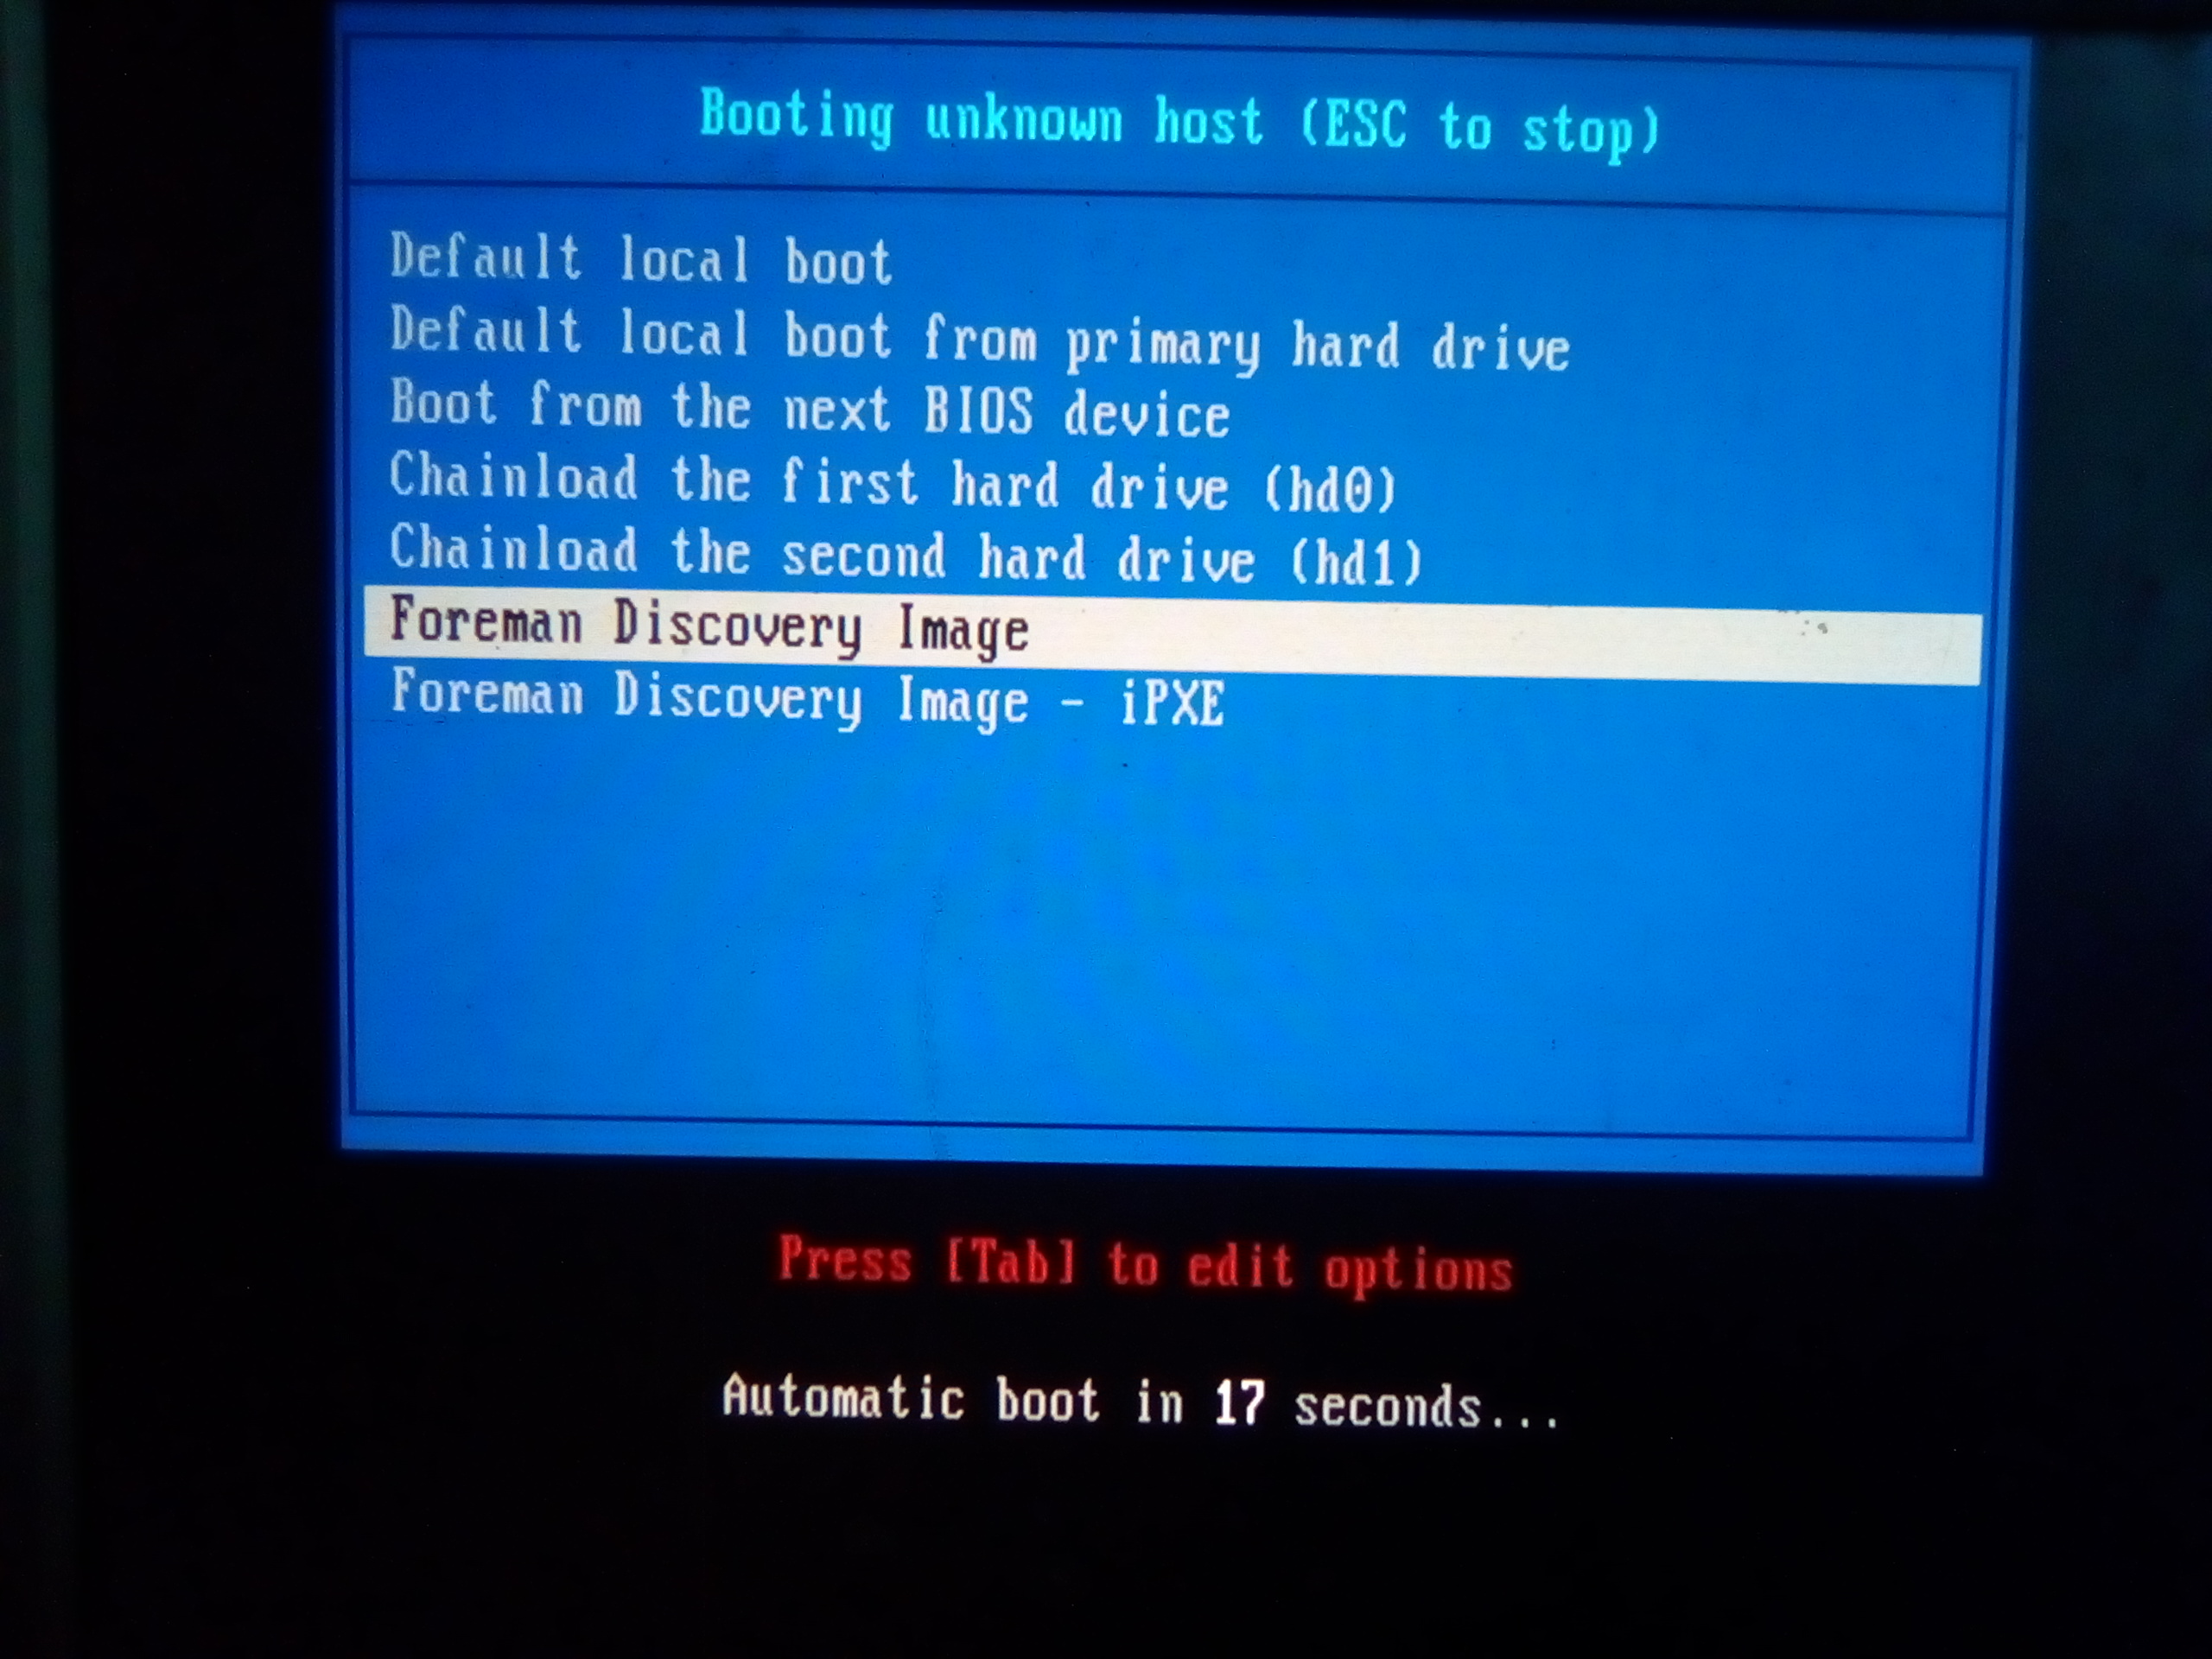
- if your subnet and settings are correct it should boot:
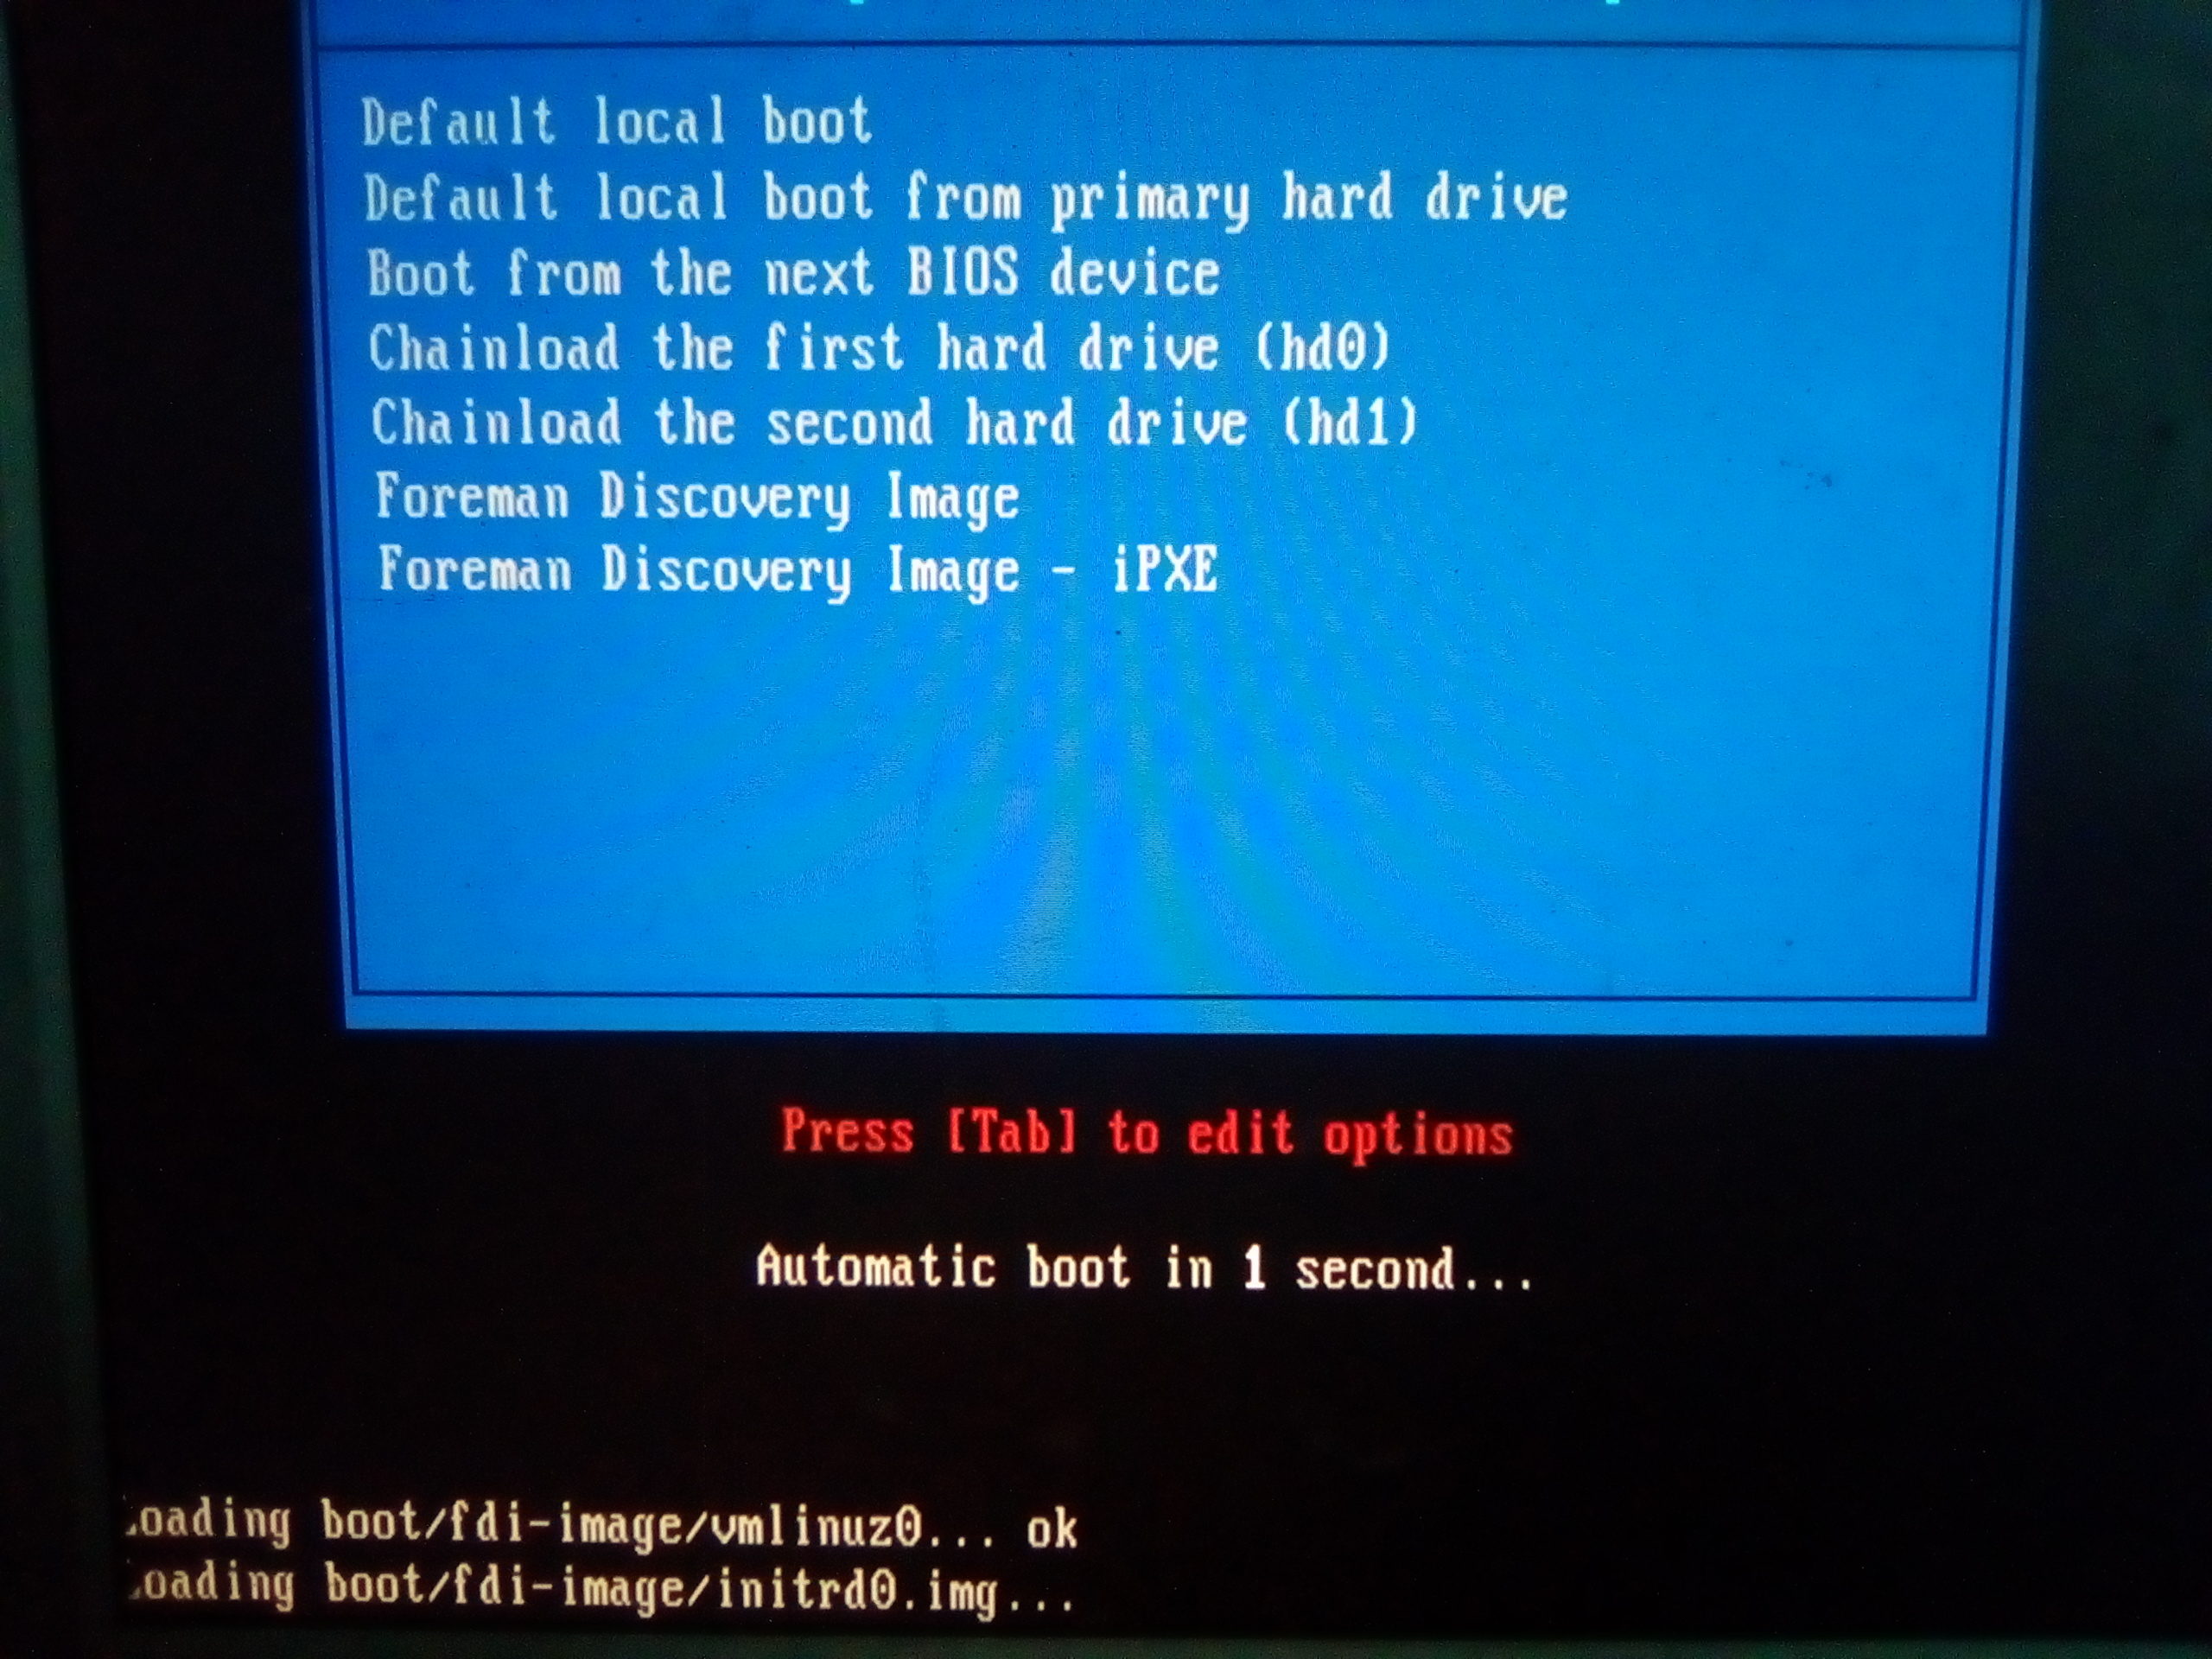
-
the Boot Image will configure NIC manually: - waiting time is quite long, but thise way boot wont fail

-
the host gets discovered:
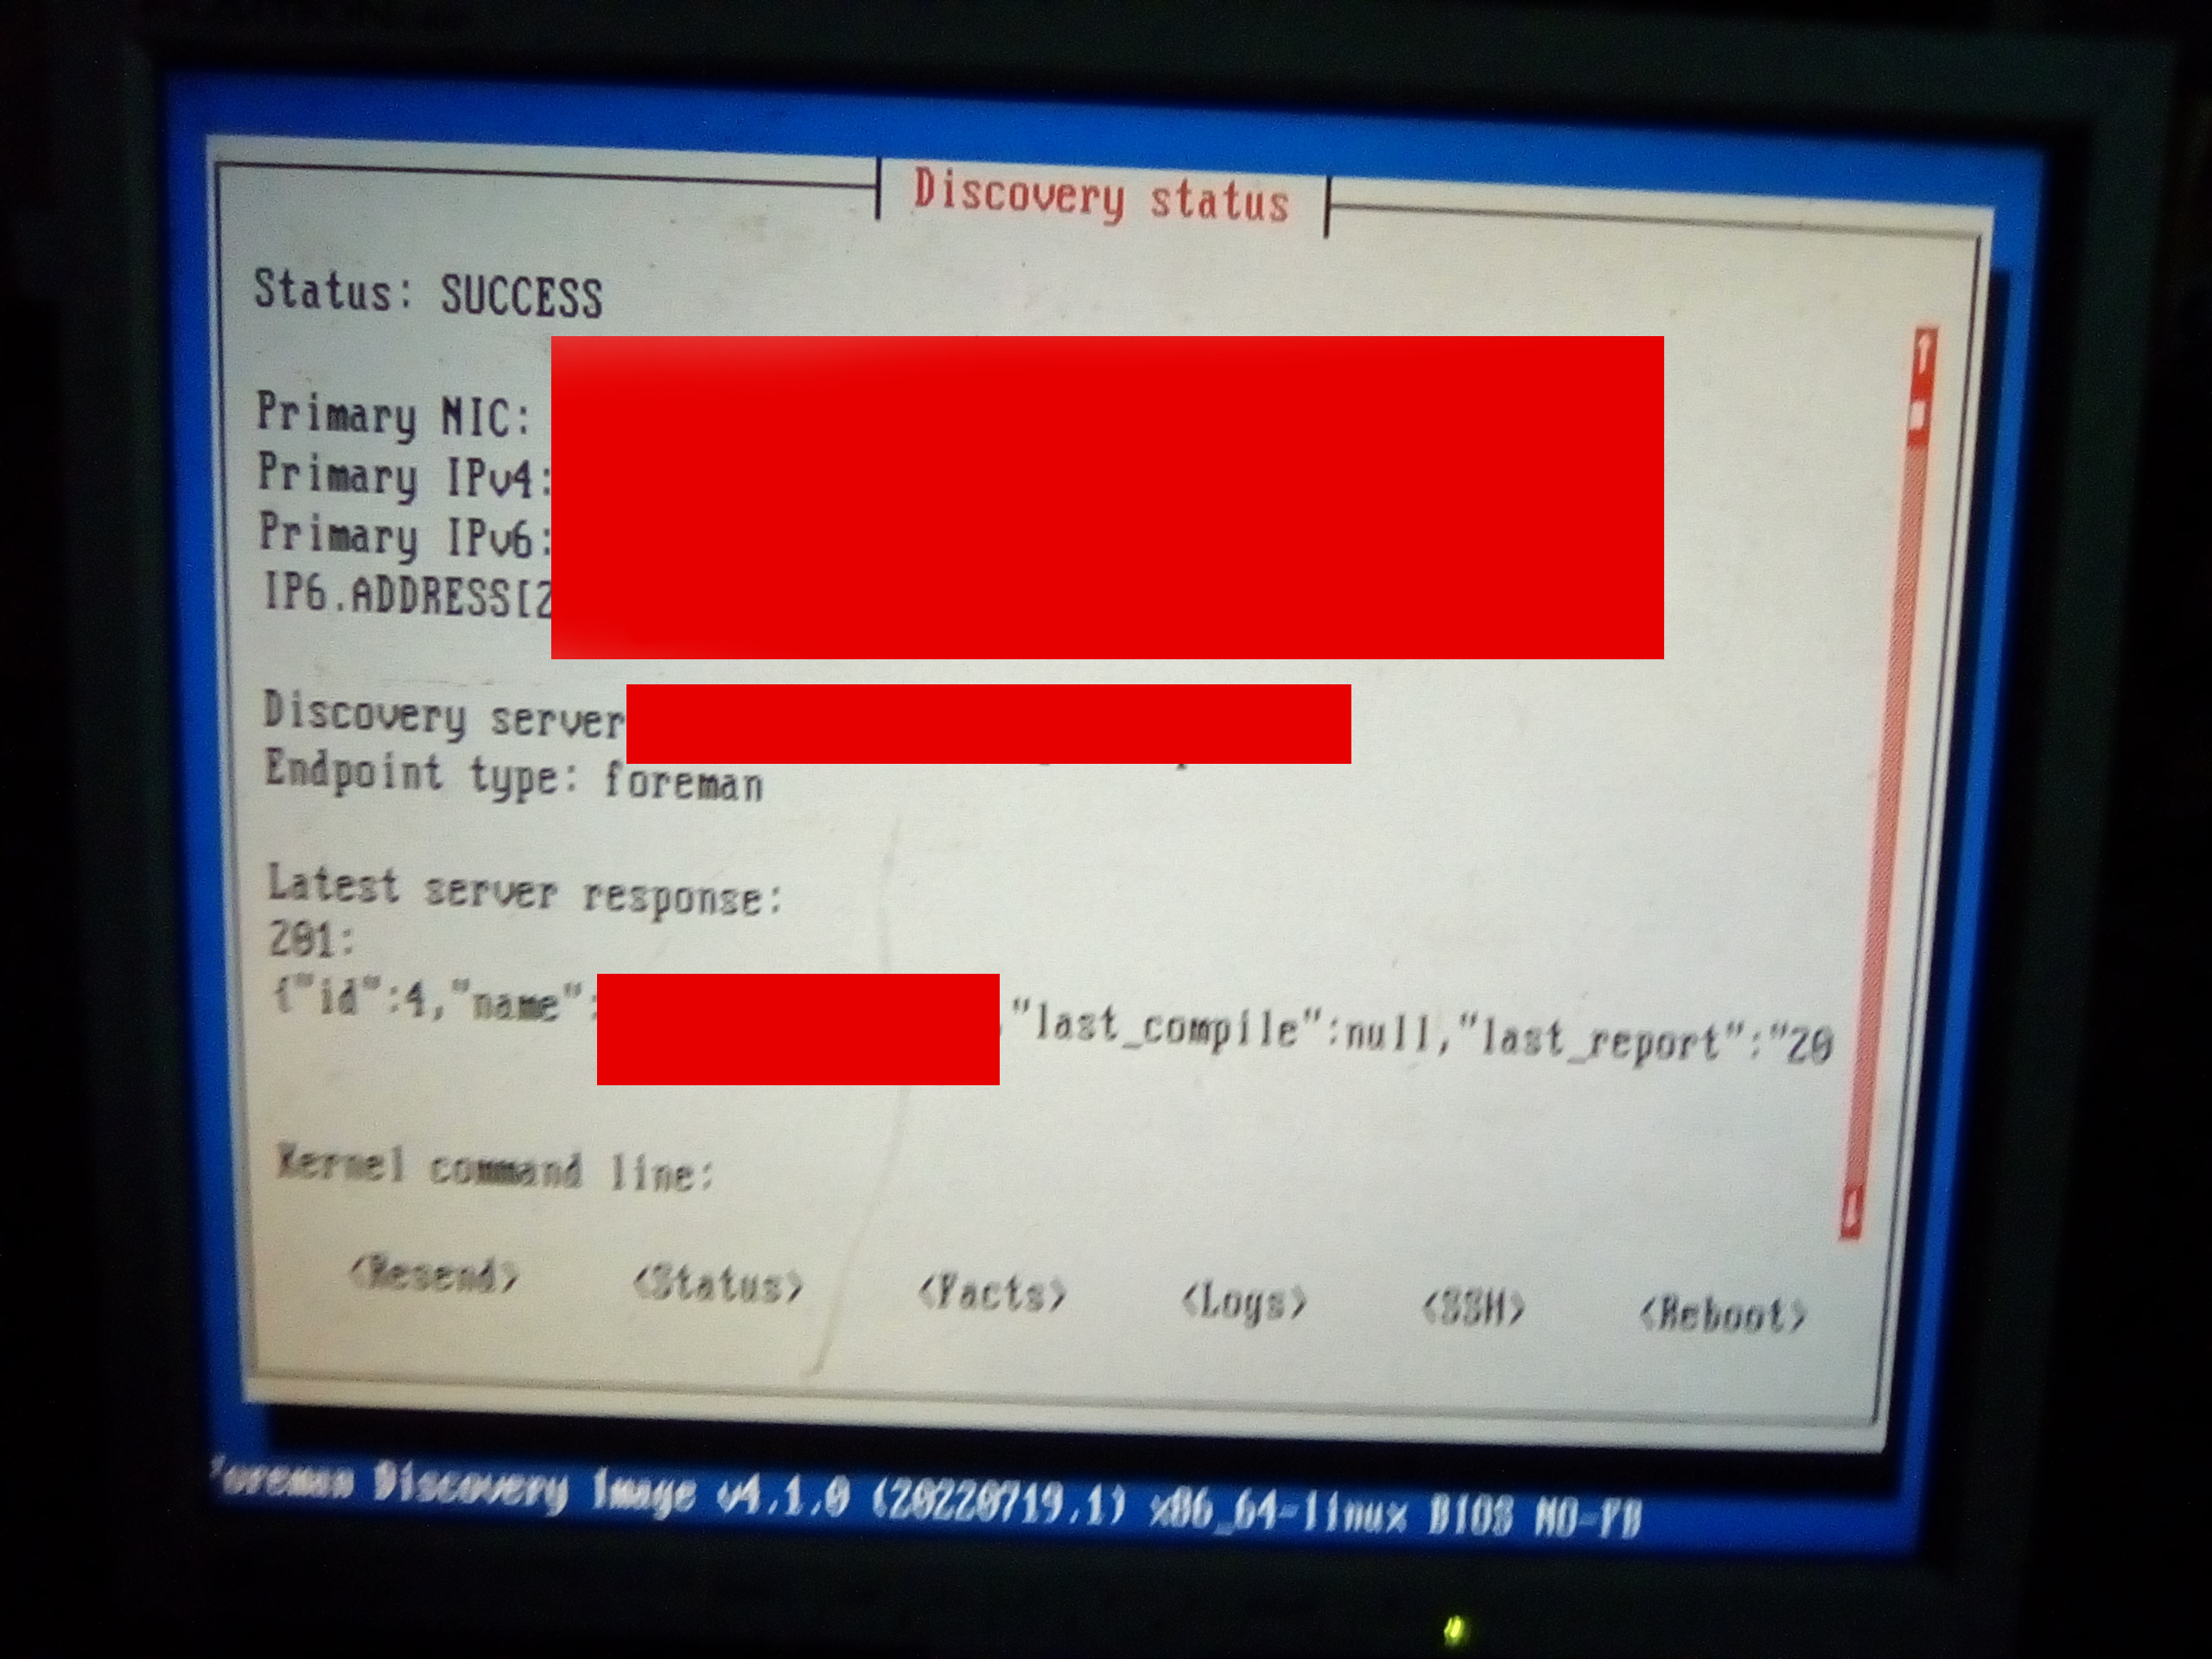
- our discovered sost is ready to get provisioned:

Provisioning
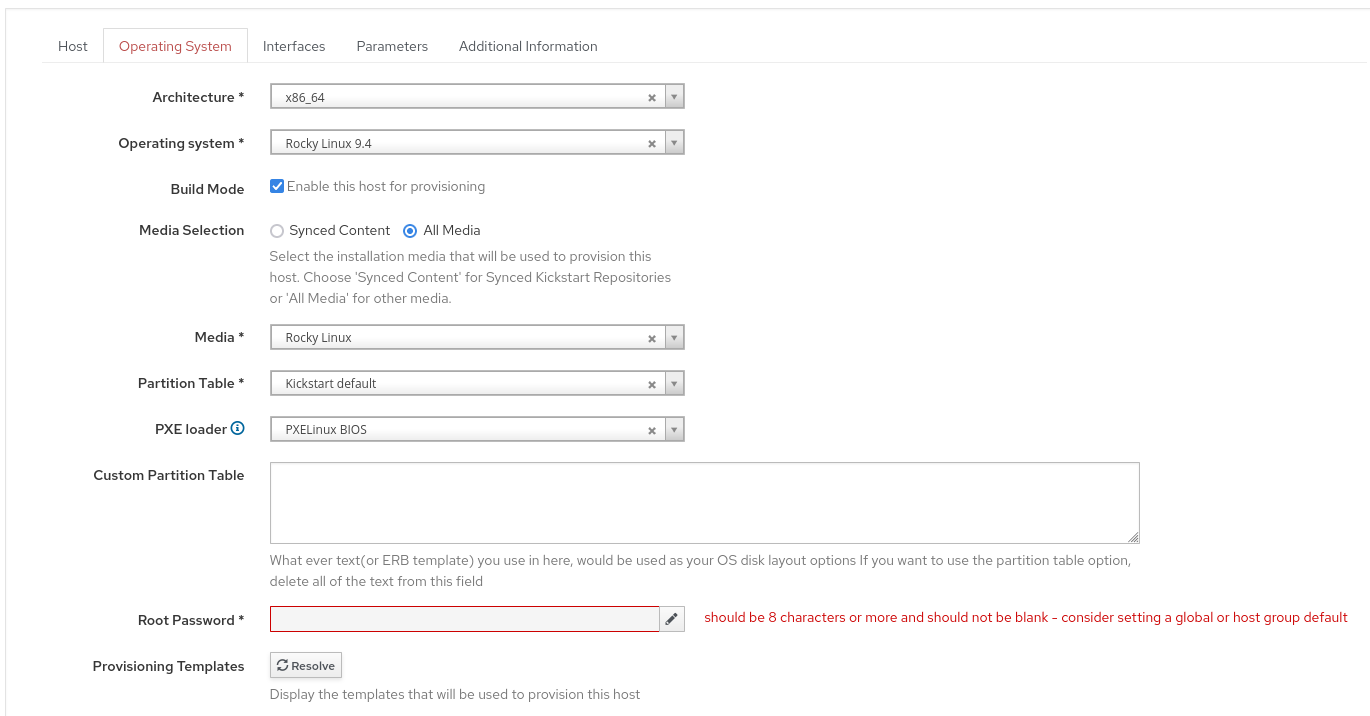
- we need a os:
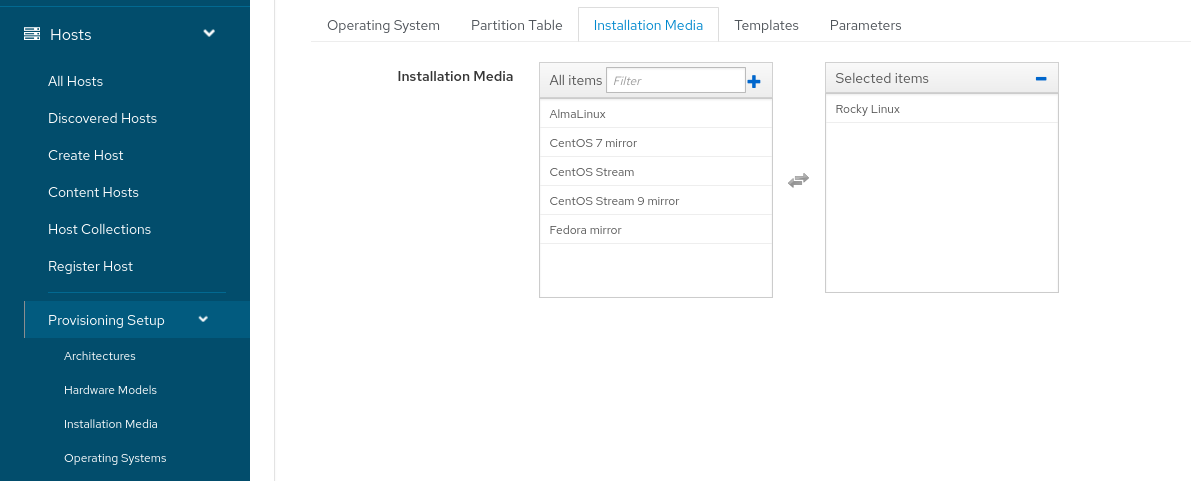
- it also needs a partition table:

- it also needs a partition table:
-
- clone the Provisioning template:
click on B)

- we need to add a os to it:

- we need to add a os to it:
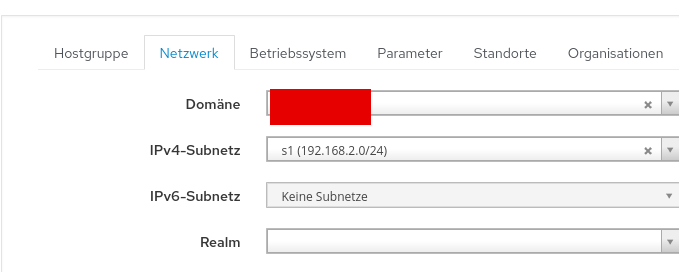
- add a Hostgroup
select our subnet:
- for simplicity i just choose my default os as the hostgroup’s os:

- for simplicity i just choose my default os as the hostgroup’s os:
- now we can create a host from the machine that was discovered before
you need to click on provision in the Discovered Host’s section
- we select our hostgroup main which we created before:
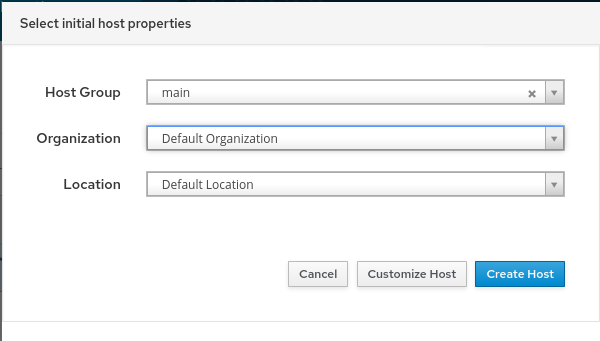
- in the Host section we need to select our proxy and hostgroup:
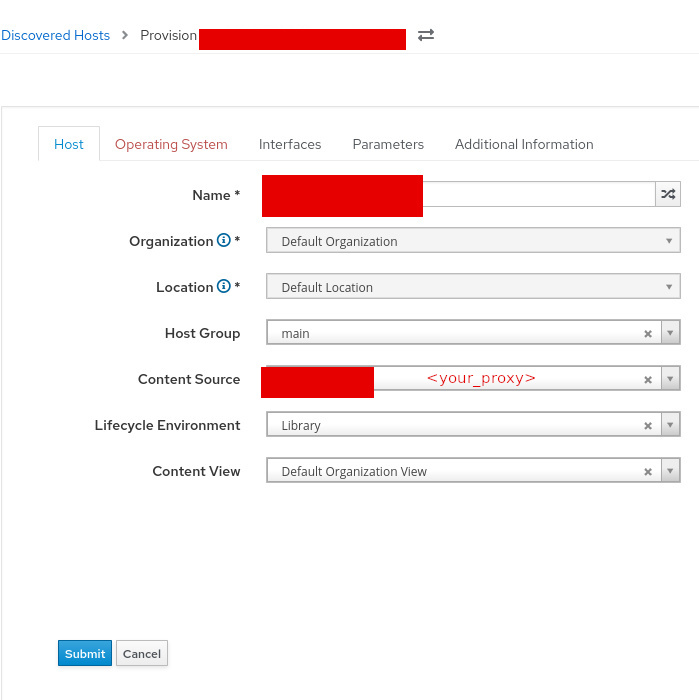
- add a password to the host and finish the provision process:
- we select our hostgroup main which we created before:
Required Knowledge
- this might be a little redundant at the moment, but i thought its better to explain everything step after step, so the diagramms wont get to large
DHCP
sequenceDiagram
  participant Client as Client Device
  participant DHCP_Server as DHCP Server
  participant Router as Router
  Note over Client: Client needs an IP address
  Client->>+Router: Broadcasts DHCPDISCOVER
  Router->>+DHCP_Server: Forwards DHCPDISCOVER
  DHCP_Server->>+Client: Sends DHCPOFFER
  Note over Client: Client selects an offer
  Client->>+DHCP_Server: Requests DHCPREQUEST
  DHCP_Server->>+Client: Sends DHCPACK
  Note over Client: Client configures with received IP
Subnets and VLAN
```mermaid sequenceDiagram participant Client as Client Device participant VLAN as VLAN participant DHCP_Server as DHCP Server participant DNS_Server as DNS Server Note over Client: Client joins VLAN X Client-»+VLAN: Sends VLAN membership request VLAN-»+DHCP_Server: Notifies DHCP Server about new client in VLAN X DHCP_Server-»+Client: Offers IP address from subnet Y Client-»+DHCP_Server: Accepts IP address offer DHCP_Server-»+Client: Assigns IP address from subnet Y Note over Client: Client is now configured with IP from subnet Y Note over Client: Client uses VLAN for network traffic Client-»+DNS_Server: Sends DNS query for www.example.com DNS_Server-»+Client: Returns IP address for www.example.com Note over Client: Client accesses www.example.com using the returned IP address
> - MAAS:
> 	- Focus: Direct management of VLANs and subnets within the platform itself.
> 	- Functionality: Allows creation and management of multiple VLANs, supporting both tagged and untagged VLANs on managed switches. Each fabric has a default VLAN, with additional VLANs added for logical separation within the same physical infrastructure.
> - Foreman:
> 	- Focus: Primarily focused on provisioning hosts and configuring their network settings.
> 	- Functionality: Can provision hosts across various subnets but does not directly manage VLANs. Requires separate network-level configuration for creating and managing VLANs.
> In essence, MAAS offers integrated VLAN and subnet management within its environment, whereas Foreman focuses on host provisioning and network configuration, leaving VLAN management to external network administration.

### DNS
```mermaid
sequenceDiagram
    participant Client as Client Device
    participant DNS_Client as DNS Client
    participant DNS_Server as DNS Server
    Note over Client: Client wants to access www.example.com
    Client->>+DNS_Client: Sends DNS query for www.example.com
    DNS_Client->>+DNS_Server: Queries DNS Server for www.example.com
    DNS_Server->>+DNS_Client: Returns IP address for www.example.com
    DNS_Client->>+Client: Sends IP address for www.example.com
    Note over Client: Client accesses www.example.com using the returned IP address
- do routers have dns?
…
- most SOHO routers have a built-in DNS server to act as a cache. It’s not a mandatory “router” feature though – enterprise networks would run their DNS on a separate system instead.
- If this is so, then I guess that DNS server would just be another cache similar to the one in Windows…or is it a more advanced DNS server?
- It varies between products. Talking about SOHO routers, the router’s own DNS server is pretty much always just a caching proxy and actual name resolution relies on forwarding requests to an upstream resolver; no root hints involved.
- But in addition to that, it is also quite common for the router to be authoritative for some “local” domain (like .lan or .home or .dlink) which contains hostnames for your LAN hosts. This integrates with the router’s DHCP service, collecting hostnames that devices provide in their lease requests. It may even support static entries, though in SOHO routers it’s rarely anything more than a single ‘A’ record per name.
- why does foreman require dns?
- To provision with Foreman, the DNS domain of the router is essential because Foreman requires defined domain names for every host in the network. These domain names are crucial for managing A-, AAAA-, and PTR resource records. Even if Foreman doesn’t manage your DNS servers, you still need to create at least one domain and assign it. Domains are part of the naming conventions that Foreman uses for hosts, for example, a host named test123 in the example.com domain has the fully qualified domain name test123.example.com.
- During the DNS record creation process, Foreman performs conflict DNS answers to ensure that the hostname is not actively being used. This check is performed against one of the following DNS servers: - The system-wide resolver, if under Administer > Settings > Query local nameservers the option true is enabled. - The nameservers defined in the subnet agreement with the host. - The authoritative NS-records derived from the SOA (Start of Authority) of the domain name associated with the host.
- Therefore, knowing the domain name of the router is crucial for successful provisioning with Foreman to ensure that all DNS queries are handled correctly and no conflicts arise. This is particularly important when Foreman attempts to dynamically assign IP addresses or checks existing DNS entries to ensure that no IP addresses are duplicated.
hosts file
This diagram outlines the differences in the process of resolving a domain name using the hosts file versus a DNS server:
- This sequence diagram simplifies the process for illustrative purposes. The actual process may involve additional steps, such as DNS caching and recursive queries, depending on the network infrastructure and protocols in use.
sequenceDiagram
    participant Client as Client Device
    participant Browser as Web Browser
    participant Hosts_File as Hosts File
    participant DNS_Server as DNS Server
    Note over Client: Client wants to access www.example.com
    Browser->>+Hosts_File: Checks for www.example.com
    Hosts_File->>+Browser: Returns IP address if found
    Note over Browser: Uses IP address from Hosts File
    Browser->>+DNS_Server: Queries DNS Server for www.example.com
    DNS_Server->>+Browser: Returns IP address for www.example.com
    Note over Browser: Uses IP address from DNS Server
- Using the Hosts File:
- The client’s web browser first checks the hosts file for an entry corresponding to the domain name (www.example.com).
- If an entry is found, the browser uses the IP address listed in the hosts file to connect to the website.
- This method bypasses DNS resolution entirely, relying solely on local entries.
- Using a DNS Server:
- If the hosts file does not contain an entry for the domain, the browser queries a DNS server for the IP address associated with www.example.com.
- The DNS server returns the IP address, which the browser then uses to establish a connection to the website.
- This method relies on external DNS services to resolve domain names. The key difference lies in the source of the IP address used for accessing the website:
- Hosts File: Provides static mappings of domain names to IP addresses on a local machine, taking precedence over DNS when resolving domain names locally.
- DNS Server: Acts as a global directory service, dynamically resolving domain names to IP addresses based on the current state of the internet.
PXE and TFTP
This diagram outlines the basic steps involved in the PXE and TFTP boot process:
sequenceDiagram
    participant Client as Client Device
    participant DHCP_Server as DHCP Server
    participant TFTP_Server as TFTP Server
    participant PXE_DP as PXE Distribution Point
    Note over Client: Client starts booting
    Client->>+DHCP_Server: Sends DHCPDISCOVER
    DHCP_Server->>+Client: Sends DHCPOFFER with IP, TFTP Server info
    Client->>+TFTP_Server: Requests boot image
    TFTP_Server->>+Client: Sends boot image
    Client->>+PXE_DP: Executes boot image
    Note over Client: Client boots from network
- Client Starts Booting: The client device initiates the boot process.
- Sends DHCPDISCOVER: The client sends a DHCPDISCOVER packet to discover available DHCP servers.
- Receives DHCPOFFER: The DHCP server responds with a DHCPOFFER packet, providing the client with an IP address and the address of the TFTP server.
- Requests Boot Image: The client requests the boot image from the TFTP server.
- Sends Boot Image: The TFTP server sends the boot image to the client.
- Executes Boot Image: The client executes the boot image, initiating the boot process from the network.
Foreman Smartproxy & Network Configuration Process
This diagram provides a visual representation of the network configuration process, detailing how a client PC interacts with various components such as VLAN, DNS Server, DHCP in Router, and Storage during the boot process
sequenceDiagram
    participant Client as Client Device
    participant PXE as PXE (Preboot Execution Environment)
    participant DHCP_Server as DHCP Server
    participant DNS_Server as DNS Server
    participant Foreman as Foreman
    participant SmartProxy as SmartProxy
    participant TFTP_Server as TFTP Server
    participant HTTP_Server as HTTP Server
    Note over Client: Client starts boot process
    Client->>+PXE: Initiates PXE Boot
    PXE->>+DHCP_Server: Sends DHCPDISCOVER
    DHCP_Server->>+PXE: Sends DHCPOFFER with IP Address
    PXE->>+Client: Sends IP Address
    Note over Client: Client receives IP Address
    Client->>+DNS_Server: Sends DNS query for Foreman Domain
    DNS_Server->>+Client: Sends IP Address for Foreman Domain
    Note over Client: Client configures DNS settings
    Client->>+SmartProxy: Sends PXE Boot Request
    SmartProxy->>+Foreman: Sends request for Host Provisioning
    Foreman->>+HTTP_Server: Sends request for Host Template
    HTTP_Server->>+Foreman: Sends Host Template
    Foreman->>+SmartProxy: Sends response with Host Information
    SmartProxy->>+Client: Sends Boot Image via TFTP
    Client->>+TFTP_Server: Sends request for Boot Image
    TFTP_Server->>+Client: Sends Boot Image
    Note over Client: Client boots from network
you made it trough the tutorial!!!